Description
Keto coconut flour pie crust delivers a delightful low-carb alternative to traditional pastry. Crisp, buttery layers provide perfect support for sweet or savory fillings without compromising dietary goals, making you feel satisfied and nourished.
Ingredients
Scale
Main Ingredients:
- 2 large Eggs
- ½ cup (115 grams) Unsalted butter (cold, cut into pieces)
- ¾ cup (90 grams) Coconut Flour
Sweetening and Seasoning:
- ¼ cup (50 grams) Monk Fruit Allulose Blend (skip for savoury crust)
- ¼ teaspoon (1 gram) Sea salt (or ½ teaspoon for savoury crust)
Flavor Enhancers:
- ½ teaspoon (2.5 milliliters) Vanilla extract (optional, skip for savoury crust)
Instructions
- Prepare the oven by heating to 350°F (177°C). Create a non-stick surface in a 9-inch (23 cm) round pie pan by either lining the bottom with parchment paper or thoroughly greasing the pan.
- In a food processor, combine coconut flour, softened butter, monk fruit allulose blend, and sea salt. Pulse the ingredients until they form a consistent, crumbly mixture.
- Introduce eggs and vanilla extract to the processor, blending until a cohesive dough develops. The mixture should hold together when pressed.
- Carefully transfer the prepared dough into the prepared pie pan. Use your fingers or the back of a spoon to evenly distribute and press the dough across the bottom and sides of the pan.
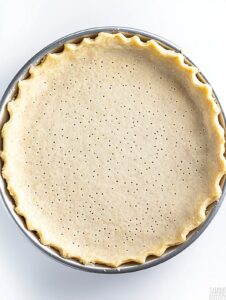
- Using a fork or toothpick, create multiple small punctures across the bottom of the crust to prevent air bubbles and ensure even baking.
- Place the crust in the preheated oven and bake for 10-15 minutes. Look for a firm texture and a very light golden color around the pan’s edges.
- Remove the crust from the oven and allow it to rest at room temperature for a minimum of 10 minutes. This cooling period helps the crust set and stabilize.
- If the crust edges begin to brown too quickly during subsequent baking, gently cover them with aluminum foil to prevent excessive browning.
- Ensure the crust is completely cooled before adding any filling or cutting to maintain its structural integrity.
Notes
- Cooling is crucial for a pristine pie crust. Let the baked crust rest for 10 minutes before adding any filling to maintain its crisp texture.
- Fork technique prevents puffy problems. Gently poke small holes across the bottom of the crust to stop unwanted bubbling during baking.
- Firm pressing ensures perfect results. Spread the dough evenly and smoothly into the pie pan for a consistent, professional-looking crust.
- Parchment paper saves the day. Line your pie pan with this handy kitchen helper to guarantee easy, mess-free crust removal.
- Cold butter creates magical flakiness. Keep your butter refrigerator-cold when mixing into the dough for an irresistibly tender, layered crust.
- Prep Time: 10 minutes
- Cook Time: 10 minutes
- Category: Desserts, Snacks
- Method: Baking
- Cuisine: American
Nutrition
- Serving Size: 8
- Calories: 111
- Sugar: 0g
- Sodium: 105mg
- Fat: 9g
- Saturated Fat: 6g
- Carbohydrates: 4g
- Fiber: 2g
- Protein: 2g
- Cholesterol: 31mg