Cream Cheese Squares Recipe

The Perfect Cream Cheese Squares Recipe for Sweet Cravings

Cream cheese squares dance between decadence and simplicity, enhanceing basic ingredients into a mouthwatering sensation.

Soft and velvety, these delectable treats promise pure culinary comfort with every single bite.

Rich layers blend seamlessly, creating a harmonious balance of textures that tempt even the most discerning palate.

Unassuming yet elegant, this dessert transcends ordinary expectations with its creamy, luxurious profile.

Minimal effort yields maximum satisfaction, making cream cheese squares a go-to recipe for spontaneous sweet cravings.

Light and indulgent, they effortlessly elevate any gathering or quiet moment of personal enjoyment.

Prepare to fall in love with a dessert that whispers gourmet yet screams accessibility.

Smart Tips for Cream Cheese Squares Fans

Smart Tips for Cream Cheese Squares Fans
  • Soften Cream Cheese Perfectly: Leave cream cheese at room temperature for 30-45 minutes before mixing to ensure smooth, lump-free blending.
  • Create Clean Slice Lines: Use a sharp knife dipped in hot water and wiped dry between cuts for pristine, clean-edged squares.
  • Prevent Overbaking: Watch the edges carefully during baking; golden brown signals doneness without drying out the creamy center.
  • Enhance Flavor Depth: Consider adding a pinch of lemon zest to the cream cheese layer for a subtle, bright flavor enhancement.
  • Store Smartly: Refrigerate squares in an airtight container for up to 5 days, separating layers with parchment paper to maintain texture and prevent sticking.

Keeping Cream Cheese Squares Fresh & Tasty

Keeping Cream Cheese Squares Fresh & Tasty
  • Refrigerate these cream cheese squares in an airtight container for up to 5 days. Layer squares between sheets of parchment paper to prevent sticking and maintain their delicate texture. Chill the dessert quickly to preserve its fresh taste and creamy consistency.
  • Reheat individual squares gently in the microwave for 10-15 seconds on low power to maintain their soft texture. Avoid overheating, which can make the cream cheese layer become runny or tough. Let the square sit for a moment after warming to distribute heat evenly.
  • Freezing works wonderfully for long-term storage. Wrap each square tightly in plastic wrap, then place in a freezer-safe container for up to 3 months. Thaw overnight in the refrigerator before serving to keep the original texture and flavor intact.

What to Sip or Serve with Cream Cheese Squares

What to Sip or Serve with Cream Cheese Squares
  • Pair with Refreshing Beverage: Crisp, chilled white wine or sparkling moscato perfectly complements the rich, creamy dessert, balancing its sweetness with a light, effervescent touch.
  • Enhance with Fruit Accompaniment: Fresh strawberries or raspberry coulis add a bright, tangy contrast to the rich cream cheese squares, cutting through the dessert's dense texture.
  • Serve with Complementary Side: Vanilla bean ice cream or whipped cream provides a cool, smooth counterpoint to the warm, golden cake base, creating a delightful textural experience.

Different Twists on Cream Cheese Squares

Different Twists on Cream Cheese Squares
  • Fruity Cream Cheese Fusion: Add a layer of raspberry or strawberry jam between the cake base and cream cheese topping for a burst of fruity flavor.
  • Chocolate Lover's Dream: Mix cocoa powder into the cake base and sprinkle chocolate chips over the cream cheese layer for an indulgent chocolate version.
  • Nutty Crunch Sensation: Sprinkle chopped pecans or almonds on top of the cream cheese layer before baking to add a delightful texture and nutty undertone.
  • Lemon Zest Brightener: Incorporate lemon zest into the cream cheese mixture and add a light drizzle of lemon glaze after cooling for a refreshing citrus kick.

Why Cream Cheese Squares Are Everyone’s Favorite Treat

Why Cream Cheese Squares Are Everyone’s Favorite Treat
  • Indulge in Effortless Elegance: These cream cheese squares deliver maximum flavor with minimal kitchen effort, perfect for bakers of all skill levels who want a stunning dessert without complicated techniques.
  • Texture Wonderland: Experience a delightful contrast between the soft, crumbly cake base and the silky-smooth cream cheese topping that melts perfectly in your mouth with each delectable bite.
  • Quick Crowd-Pleaser: Whip up this dessert in under an hour, making it ideal for spontaneous gatherings, potlucks, or when you need a fast sweet treat that looks and tastes like you spent hours preparing.
  • Comfort Dessert Upgrade: Transform a simple yellow cake mix into a luxurious dessert that feels both nostalgic and gourmet, satisfying sweet cravings with its rich, creamy profile and simple yet sophisticated presentation.

What Goes into Cream Cheese Squares

Base Layer Ingredients:
  • Yellow Cake Mix: A convenient base that provides structure and sweet flavor for the dessert.
  • Eggs: Bind the ingredients together and add richness to the base layer.
  • Butter (Softened): Adds moisture and helps create a tender cake-like crust.
Cream Cheese Topping Ingredients:
  • Cream Cheese (Room Temperature): Creamy, tangy base that creates the signature smooth topping.
  • Confectioners Sugar: Provides sweetness and helps create a smooth, spreadable texture.
  • Vanilla Extract: Enhances overall flavor with its warm, sweet aroma.
Preparation Ingredients:
  • Butter or Parchment Paper: Helps prevent sticking and makes removing the dessert easier.

Making Cream Cheese Squares Like a Pro

Making Cream Cheese Squares Like a Pro

Step 1: Preheat and Prepare Baking Dish

Heat oven to 350°F. Grease a 9×13-inch baking pan with butter or line with parchment paper for easy removal.

Step 2: Create Cake Base Layer

In a large mixing bowl, combine:
  • Yellow cake mix
  • Beaten eggs
  • Softened butter

Mix thoroughly until well blended. Press the mixture evenly into the prepared pan, creating a firm base layer.

Step 3: Whip Up Creamy Topping

In a separate bowl, blend:
  • Confectioner's sugar
  • Room temperature cream cheese
  • Vanilla extract

Whisk until smooth and creamy. Spread this mixture evenly over the cake base.

Step 4: Bake to Perfection

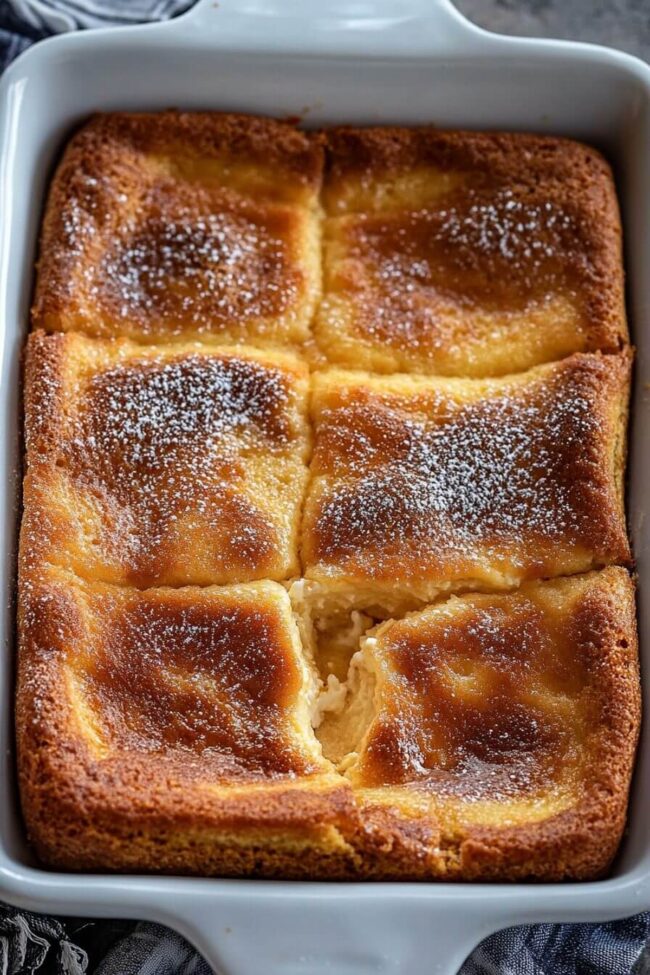
Slide the pan into the preheated oven. Bake for 35 minutes or until the top turns golden brown around the edges. The center should be set but still soft.

Step 5: Cool and Slice

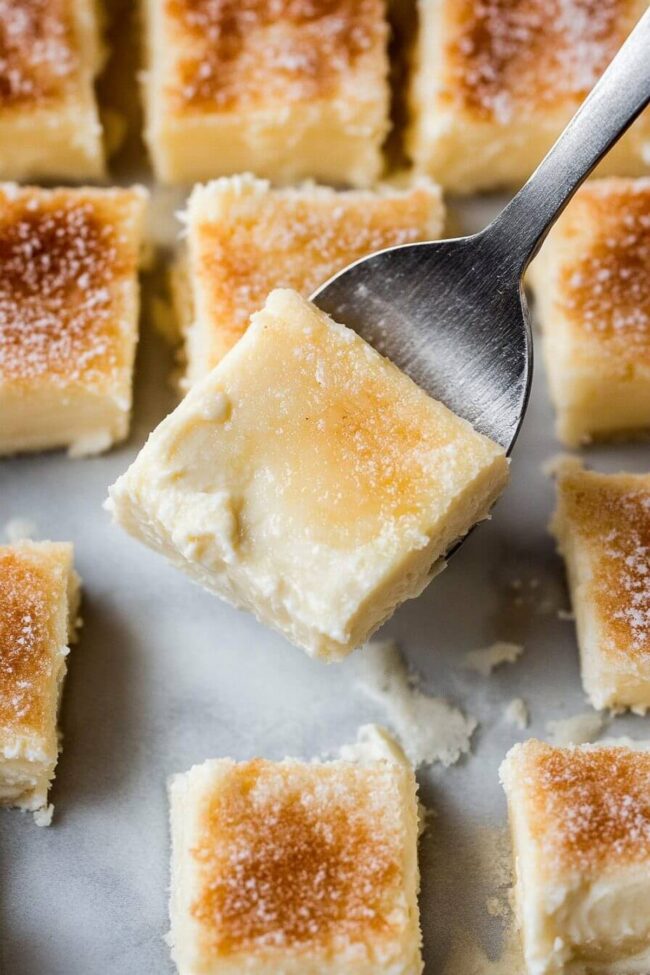
Remove from oven and let cool completely. For clean, sharp cuts, use a knife wiped between each slice. Cut into squares and serve.

Print
clock clock iconcutlery cutlery iconflag flag iconfolder folder iconinstagram instagram iconpinterest pinterest iconfacebook facebook iconprint print iconsquares squares iconheart heart iconheart solid heart solid icon
Cream Cheese Squares Recipe

Cream Cheese Squares Recipe


5 Stars 4 Stars 3 Stars 2 Stars 1 Star

4.8 from 13 reviews

  • Total Time: 45 minutes
  • Yield: 12 1x

Description

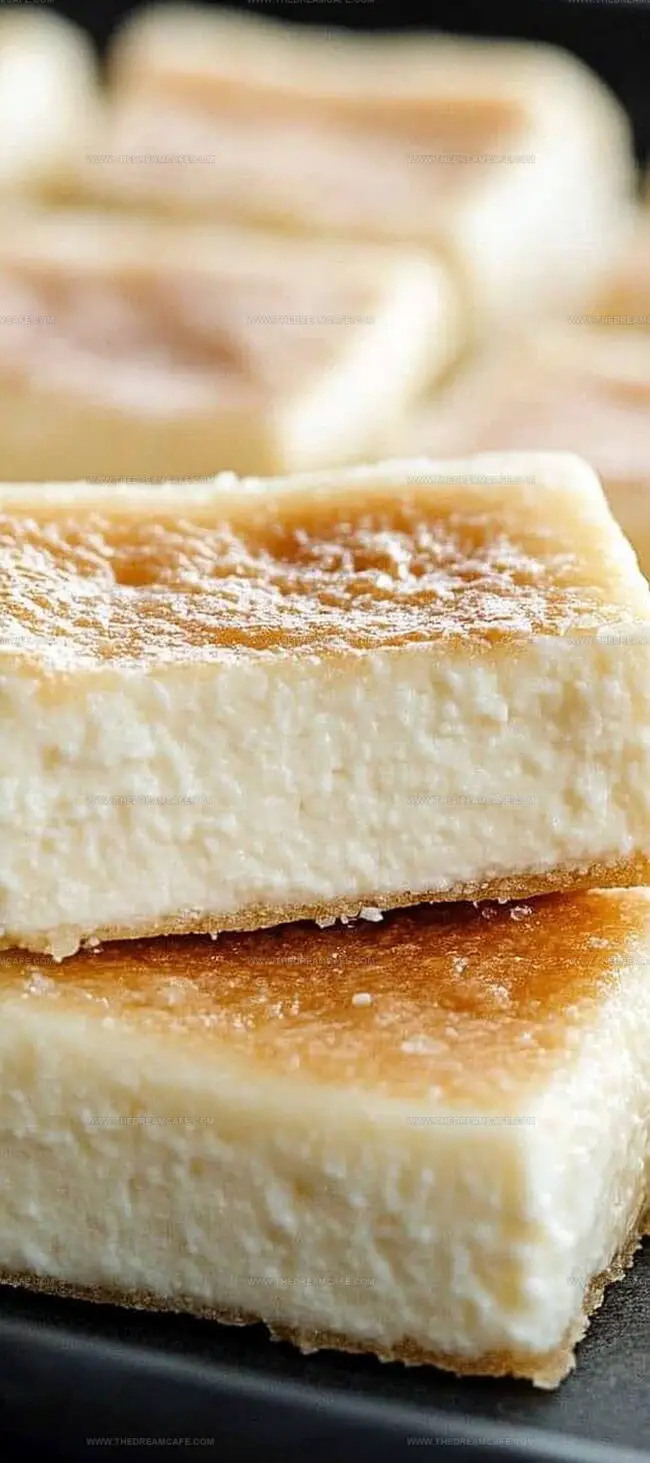
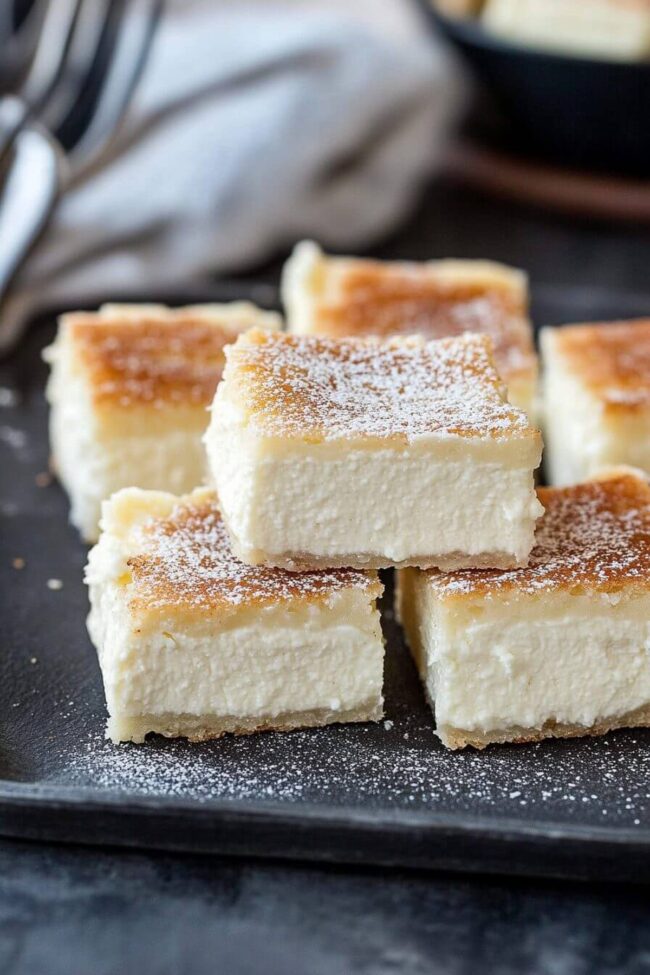
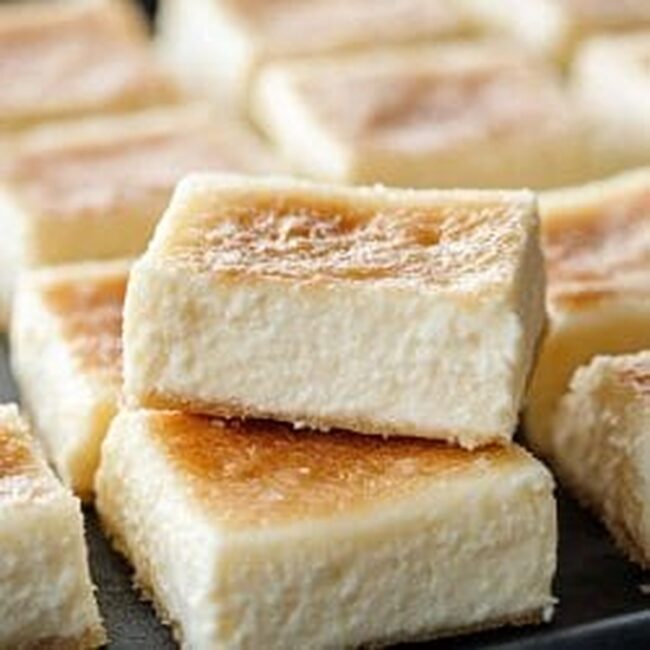
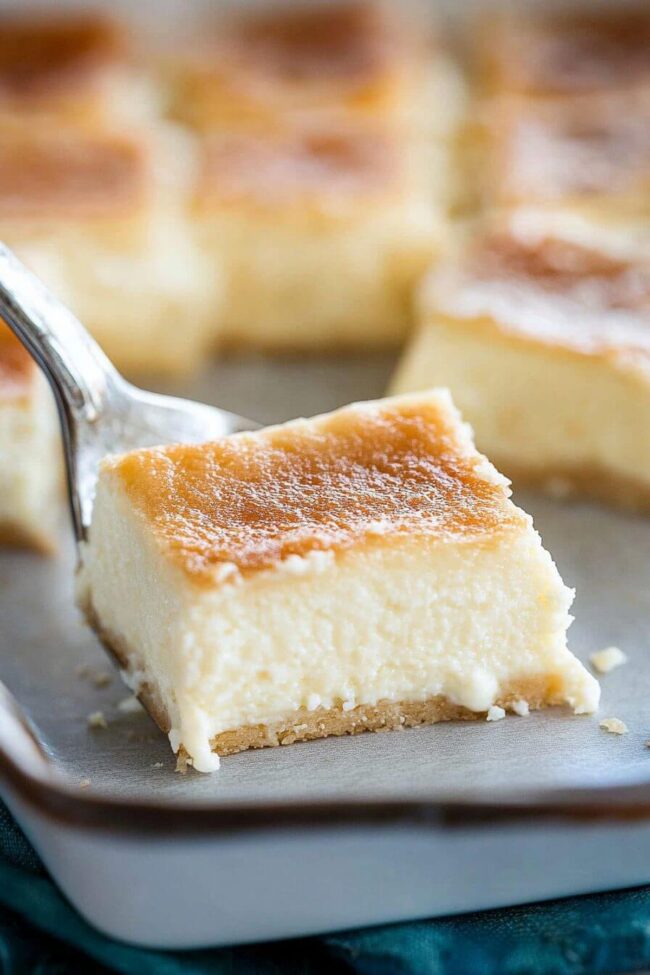
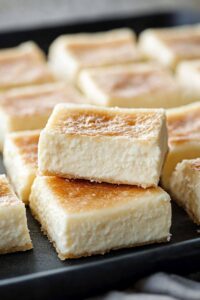
Cream Cheese Squares deliver a delightful blend of creamy richness and sweet indulgence. Buttery graham cracker crust cradles a silky smooth filling that melts in your mouth, promising pure dessert bliss with each delectable bite.


Ingredients

Scale

Main Ingredients:

  • 1 box yellow cake mix
  • 2 large eggs
  • ½ cup (113 grams) butter
  • 8 ounces (226 grams) cream cheese

Sweeteners:

  • 4 cups (454 grams) confectioners sugar

Flavoring:

  • 1 teaspoon vanilla extract

Instructions

  1. Preheat the oven to 350°F (175°C) and line a 9×13-inch (23×33 centimeters) baking dish with parchment paper, ensuring easy removal of the dessert later.
  2. Combine yellow cake mix, lightly beaten eggs, and softened unsalted butter in a large mixing bowl. Blend thoroughly until ingredients form a cohesive mixture. Press the resulting dough evenly across the bottom of the prepared baking dish, creating a uniform base layer.
  3. In a separate bowl, whisk together confectioners’ sugar, room-temperature cream cheese, and pure vanilla extract until the mixture achieves a silky, smooth texture with no lumps.
  4. Gently spread the cream cheese mixture over the cake base, ensuring an even distribution that covers the entire surface without creating air pockets.
  5. Transfer the baking dish to the preheated oven and bake for 35 to 40 minutes. Look for subtle golden-brown edges and a slightly set top as indicators of doneness. Avoid overbaking to maintain a soft, tender texture.
  6. Remove from the oven and allow the dessert to cool completely at room temperature. This resting period helps the layers set and makes cutting easier.
  7. Once cooled, use a sharp knife wiped clean between cuts to slice into neat, uniform squares. Serve and enjoy the creamy, decadent treat.

Notes

  • Prep this dessert when craving something sweet and effortless.
  • Chilling the squares overnight enhances their rich, creamy texture and allows flavors to meld beautifully.
  • Cream cheese mixture works best when ingredients are completely at room temperature for smooth blending.
  • Store leftover squares in an airtight container inside the refrigerator for up to five days.
  • Sprinkle powdered sugar on top for an elegant finishing touch that adds a delicate sweetness.
  • Prep Time: 10 minutes
  • Cook Time: 35 minutes
  • Category: Snacks, Desserts
  • Method: Baking
  • Cuisine: American

Nutrition

  • Serving Size: 12
  • Calories: 370 kcal
  • Sugar: 37g
  • Sodium: 270mg
  • Fat: 18g
  • Saturated Fat: 10g
  • Unsaturated Fat: 6g
  • Trans Fat: 0.5g
  • Carbohydrates: 52g
  • Fiber: <1g
  • Protein: 3g
  • Cholesterol: 60mg
Julian Park

Julian Park

Co-Founder, Cuisine Researcher & Food Culture Writer

Expertise

  • Global Food Cultures & Culinary History
  • Regional Flavor Profiles & Cooking Techniques
  • Food Anthropology & Cultural Identity
  • Culinary Research & Narrative Writing
  • Street Food Traditions & Heritage Dishes

Education

The Institute of Culinary Education (ICE), Los Angeles, CA

  • Degree: Certificate in Culinary Arts
  • Focus: Professional culinary techniques, global cuisine fundamentals, and real-world training in restaurant-style cooking and food presentation.

Julian Park is a natural storyteller at The Dream Café who blends hands-on culinary experience with a passion for exploring global food traditions. A graduate of The Institute of Culinary Education in Los Angeles, Julian combines professional technique with a love for cultural discovery, diving into how dishes reflect heritage, migration, and identity. 

His work spans everything from in-depth cuisine guides to reflections on everyday meals around the world. With a curious palate and a journal always close by, Julian helps readers connect with food in a way that feels so insightful and personal.

Leave a Reply

Your email address will not be published. Required fields are marked *

Recipe rating 5 Stars 4 Stars 3 Stars 2 Stars 1 Star