Sweet, crispy cannoli cones dance with traditional Italian charm, blending a modern cannoli cones recipe twist into every delectable bite.
Creamy ricotta filling promises pure indulgence for dessert lovers.
These delightful treats bypass complex techniques, making them accessible to home bakers everywhere.
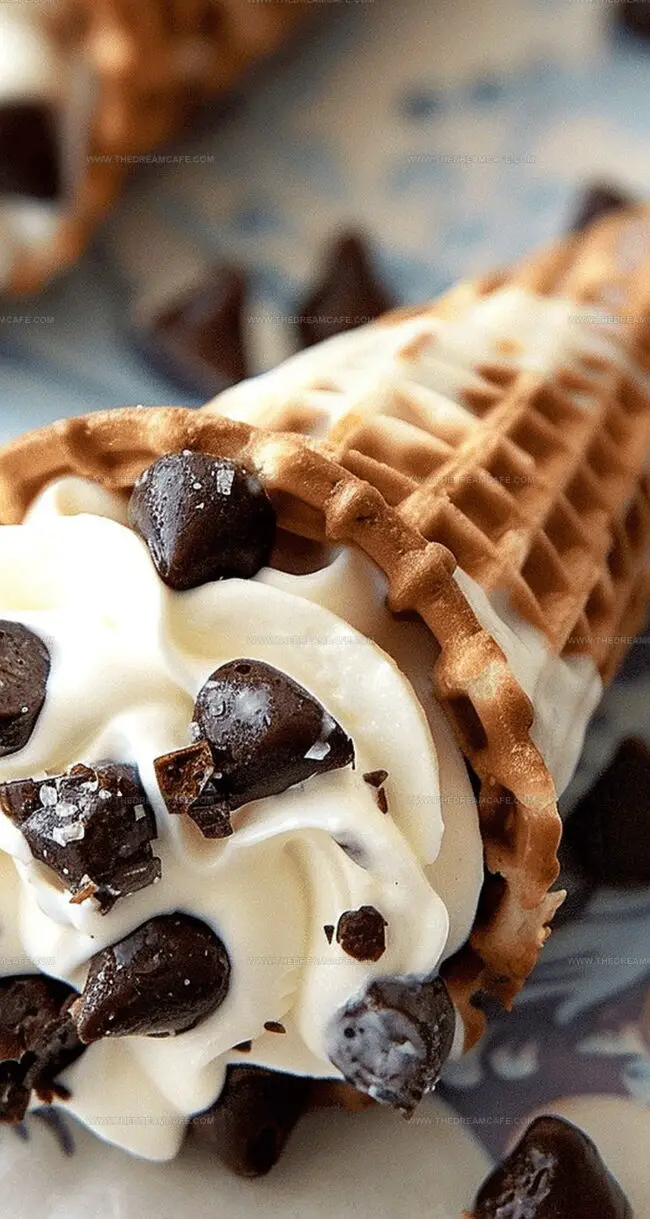
Perfectly golden and crunchy, the cone shells create a stunning canvas for rich, smooth filling.
Chocolate chips and powdered sugar add delightful texture and visual appeal to each cone.
The recipe brings a playful spin on classic cannoli, inviting you to savor each irresistible mouthful.
You’ll fall in love with this simple yet spectacular dessert that transforms an ordinary moment into something extraordinary.
Quick Recipe Overview
Prep Time: 10 minutes
Cook Time: 0 minutes
Total Time: 10 minutes
Calories: 220 kcal
Servings: 11
Cannoli Cones Ingredient Breakdown
For The Base:
Whole Milk Ricotta Cheese: Creamy foundation that gives cannoli cones their signature smooth texture, best when drained overnight to remove excess moisture.
Sugar Cones: Crispy, sweet vessels that serve as the perfect edible container for the ricotta filling, choose sturdy cones without cracks.
For The Sweeteners:
Powdered Sugar: Adds delicate sweetness and helps create a silky smooth filling, sift to prevent lumps.
Vanilla Extract: Enhances overall flavor with its warm, aromatic notes, use pure vanilla for the best taste.
For The Chocolate Elements:
Semisweet Chocolate Chips: Optional coating for cone edges that adds rich chocolate crunch, select high-quality chips for best melting.
Mini Chocolate Chips: Provides delightful chocolate bursts throughout the filling, distribute evenly for consistent chocolate in each bite.
Tools for Building Cannoli Cones at Home
Large Mesh Strainer: Essential for draining ricotta cheese and removing excess moisture overnight.
Mixing Bowls: Need two separate bowls for ricotta mixture and chocolate melting.
Paper Towels or Cheesecloth: Helps strain ricotta effectively.
Microwave-Safe Bowl: Perfect for melting chocolate chips smoothly.
Piping Bag or Spoon: Great tools for filling cannoli cones with creamy ricotta mixture.
Glass or Wax Paper: Provides support for drying chocolate-dipped cone edges.
Spatula: Helps fold chocolate chips and mix ingredients gently.
How to Fill and Assemble Cannoli Cones
Ricotta Preparation Drain excess moisture from ricotta cheese by setting a mesh strainer over a bowl lined with paper towel. Let it rest in the refrigerator overnight to achieve a thick, creamy consistency.
Chocolate Dipping Carefully melt chocolate chips in short microwave intervals, stirring until completely smooth and glossy.
Cone Decoration Gently coat sugar cone edges with melted chocolate, standing them upright to dry completely. This creates a beautiful and delicious base for your dessert.
Filling Creation Whisk drained ricotta with powdered sugar and vanilla extract until silky and well-blended.
Texture Enhancement Softly fold mini chocolate chips into the ricotta mixture, creating delightful pockets of chocolatey goodness throughout the filling.
Final Assembly Generously fill each prepared chocolate-rimmed cone with the creamy ricotta mixture using a piping bag or spoon. For best results, serve immediately or chill briefly before enjoying your delectable treat.
Topping Tips for Cannoli Cones You’ll Love
Pop Open Flavor Magic
Let ricotta sit overnight in a cheesecloth-lined strainer to remove extra moisture, guaranteeing a thick, silky smooth filling that won’t become watery.
Melt chocolate chips carefully in short microwave bursts, stirring between each interval to create a glossy, perfectly smooth coating for cone edges.
Experiment with different mix-ins like chopped pistachios, candied orange peel, or crushed amaretti cookies to add unexpected crunch and flavor complexity.
Prepare chocolate-dipped cones and ricotta filling separately up to 24 hours in advance, assembling just before serving to maintain crisp cone texture and fresh taste.
Swap vanilla extract with almond extract or add a splash of marsala wine to the ricotta mixture for a traditional Sicilian cannoli essence that elevates the entire dessert.
Fun Ways to Serve Cannoli Cones
Sweet Chocolate Swirl: Drizzle extra melted chocolate over the filled cannoli cones for a decadent finishing touch that adds visual appeal and extra richness.
Festive Topping Adventure: Sprinkle crushed pistachios, colorful sprinkles, or finely chopped almonds on the chocolate-dipped edges to create a delightful crunch and gourmet presentation.
Fruit Flavor Fusion: Garnish the tops of cannoli cones with fresh berries like raspberries or sliced strawberries to introduce a bright, tangy contrast to the creamy ricotta filling.
Dessert Platter Magic: Arrange the cannoli cones on a beautiful serving platter with a light dusting of powdered sugar and small mint leaves for an elegant and inviting dessert display that will impress guests.
Cannoli Cone Storage and Make-Ahead Tips
Smart Storage Solutions: Keep filled cannoli cones sealed in an airtight container in the refrigerator for up to 2 days to maintain their crisp texture and fresh flavor.
Prep-Ahead Magic: Separate ricotta filling and sugar cones until just before serving to prevent soggy shells and ensure maximum crunchiness.
Freezing Friendly: Wrap unfilled chocolate-dipped cones individually in plastic wrap, then store in a freezer bag for up to 3 weeks – perfect for quick dessert prep.
Freshness First: Always add chocolate chips and fill cones just before serving to guarantee the best taste and texture, preventing moisture from making the cones soft.
Ricotta Preparation: Strain ricotta cheese overnight through a fine-mesh strainer lined with cheesecloth in the refrigerator, removing excess moisture for a luxurious, creamy texture.
Chocolate Dipping: Melt semisweet chocolate chips in 20-second microwave intervals, stirring until achieving a glossy consistency, then coat sugar cone rims completely, allowing them to set vertically on parchment paper.
Filling Creation: Whisk drained ricotta with powdered sugar and vanilla extract until smooth, then gently fold in miniature chocolate chips, ensuring an even distribution for balanced flavor and delightful crunch.
Cone Assembly: Fill each chocolate-rimmed sugar cone with the ricotta mixture using a piping bag or spoon, creating elegant peaks and ensuring full coverage of the cone’s interior.
Serving: Present cannoli cones immediately for peak freshness, or refrigerate for up to 2 hours before serving, maintaining the dessert’s delicate structure and vibrant flavors.
Notes
Drain Ricotta Carefully: Remove excess moisture overnight using cheesecloth to guarantee a thick, luxurious texture that prevents watery filling.
Melt Chocolate Perfectly: Use short microwave intervals and gentle stirring to create a smooth, glossy chocolate coating without burning or seizing.
Coat Cones Strategically: Stand sugar cones vertically while chocolate-dipping to ensure even, professional-looking rims and prevent messy drips.
Serve Promptly: Enjoy cannoli cones within 2 hours of filling to maintain crisp cone texture and prevent sogginess from ricotta moisture.
Auguste Escoffier School of Culinary Arts, Boulder, CO
Degree: Diploma in Culinary Arts
Focus: Hands-on training in classic and modern culinary techniques, emphasizing sustainable cooking practices, kitchen professionalism, and real-world restaurant experience through externships.
Oregon State University
Degree: B.S. in Nutrition and Food Management
Focus: In-depth study of human nutrition, food safety, meal planning, and food-service operations, with a strong foundation in public health, dietetics, and community-based nutrition programs.
Sophie Reynolds is the recipe developer and culinary voice behind many of the approachable, flavor-focused creations at The Dream Café.
Sophie’s style leans into comfort food made simple: wholesome, satisfying meals anyone can make with confidence. Her passion lies in helping home cooks feel at ease in the kitchen while finding joy in the everyday act of cooking.


Sophie Reynolds
Co-Founder, Recipe Curator & Culinary Educator
Expertise
Education
Auguste Escoffier School of Culinary Arts, Boulder, CO
Oregon State University
Sophie Reynolds is the recipe developer and culinary voice behind many of the approachable, flavor-focused creations at The Dream Café.
Sophie’s style leans into comfort food made simple: wholesome, satisfying meals anyone can make with confidence. Her passion lies in helping home cooks feel at ease in the kitchen while finding joy in the everyday act of cooking.