
Irresistible Peanut Butter Brownie Bars Recipe for Sweet Tooths
Decadent chocolate meets creamy peanut butter in these irresistible peanut butter brownie bars that melt in your mouth.
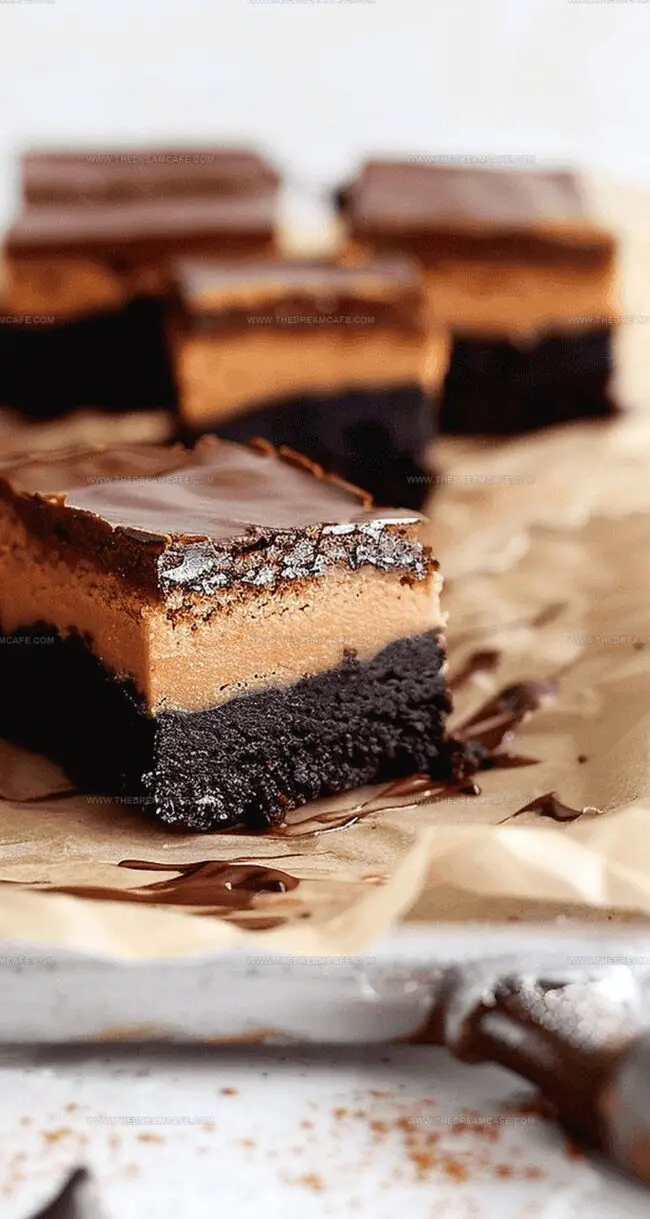
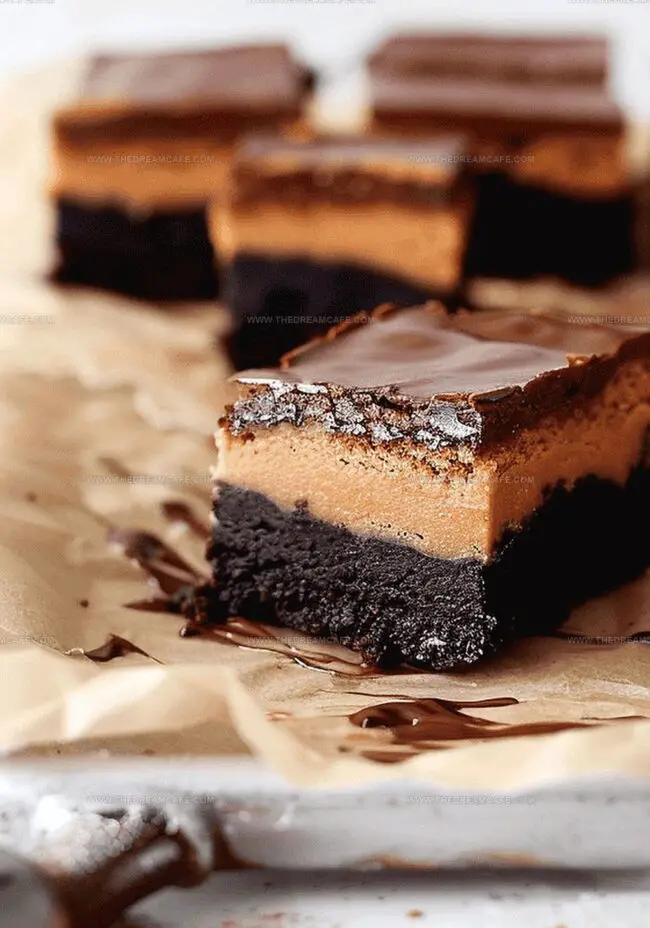
Rich, fudgy layers create a dessert guaranteed to stop conversations at any gathering.
The dense brownie base provides a perfect canvas for swirls of smooth peanut butter goodness.
Intense chocolate notes dance with nutty undertones, creating a harmonious blend of flavors.
Each bite promises a luxurious experience that balances sweetness and depth.
Chocolate lovers and peanut butter fans will absolutely adore this simple yet spectacular treat.
These bars deliver pure indulgence in every single slice.
Quick Recipe Overview
Ingredients in Peanut Butter Brownie Bars
For Chocolatey Base:For Binding and Moisture:For Sweet and Flavor Enhancement:For Dry Ingredients:Equipment You’ll Need for Brownie Bars
Making Peanut Butter Brownie Bars
Warm up your kitchen and grab your favorite baking pan. Line it with parchment paper that drapes over the sides like a cozy blanket. Melt rich chocolate and creamy butter together until they become a silky, glossy mixture that looks like liquid velvet.
Whip eggs and sugar into a cloud-like foam, blending in smooth vanilla and golden oil. Gently fold this airy mixture into your melted chocolate, creating a batter that promises pure indulgence. Pour this decadent blend into your prepared pan and send it into the oven’s warm embrace.
While your chocolate base cools, whip together a dreamy peanut butter filling that’s light as a cloud. Blend until it’s so fluffy it practically dances in your mixing bowl. Spread this creamy layer over your cooled chocolate base like a soft, luxurious blanket.
Drizzle a final layer of melted chocolate over your creation, letting it cascade and settle into a smooth, glossy finish. Chill until the layers set into a harmonious, mouthwatering treat that begs to be sliced and savored.
Texture Tips for the Best Brownie Bars
Serving Peanut Butter Brownie Bars
Store Brownie Bars Without Drying Out
Print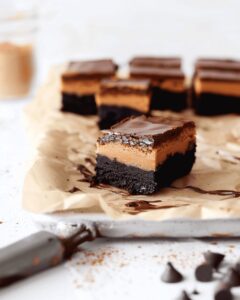
Decadent Peanut Butter Brownie Bars Recipe
- Total Time: 40 minutes
- Yield: 7 1x
Description
Indulgent peanut butter brownie bars bring together rich chocolate and creamy peanut butter in a delectable dessert. Layers of intense flavors create a luxurious treat you’ll crave long after the last crumb disappears.
Ingredients
- 2 large eggs
- 120 grams (4.2 oz) granulated sugar
- 100 grams (3.5 oz) dark chocolate
- 100 grams (3.5 oz) creamy peanut butter
- 50 grams (1.8 oz) all-purpose flour
- 50 grams (1.8 oz) additional chopped dark chocolate for drizzling
- 30 grams (1 oz) powdered sugar
- 18 milliliters (0.6 fl oz) neutral oil
- 1 teaspoon vanilla extract
Instructions
- Oven Preparation: Preheat oven to 350°F (180°C). Grease a 9×5-inch loaf pan and line with parchment paper, allowing overhang for easy removal.
- Chocolate Base Creation: Melt dark chocolate and butter using double boiler or microwave until smooth. Integrate unsweetened cocoa powder, stirring until uniform.
- Wet Ingredient Fusion: Whisk eggs, sugar, vegetable oil, and vanilla extract until creamy. Gradually blend in cooled chocolate mixture, ensuring complete incorporation.
- Batter Assembly: Fold flour and sea salt into chocolate mixture, maintaining a smooth consistency. Transfer batter to prepared pan, leveling surface with a spatula.
- Brownie Baking: Bake for 20-22 minutes, preserving a fudgy center. Cool completely at room temperature for approximately one hour.
- Peanut Butter Filling: Whip butter, peanut butter, powdered sugar, vanilla extract, and salt until light and fluffy. Create a smooth, spreadable consistency.
- Filling Application: Spread peanut butter mixture evenly across cooled brownie base. Refrigerate 20-30 minutes to set filling.
- Chocolate Glaze Topping: Melt additional dark chocolate with neutral cooking oil until glossy. Pour over chilled peanut butter layer, ensuring complete coverage.
- Final Chilling: Refrigerate to set chocolate topping completely, approximately 30-45 minutes. Remove from pan using parchment paper edges.
- Serving Preparation: Slice into precise rectangular bars. Store in airtight container in refrigerator to maintain optimal texture and freshness.
Notes
- Chocolate Quality Matters: Select premium dark chocolate with 60-70% cocoa content for richer, more complex flavor profile.
- Prevent Dry Brownies: Do not overbake; remove from oven when center still appears slightly underdone to maintain ultimate fudgy texture.
- Smooth Peanut Butter Tip: Use room temperature ingredients for seamless mixing and lighter filling consistency.
- Glaze Perfection: Add neutral oil when melting chocolate to achieve glossy, crack-free chocolate topping that sets beautifully.
- Prep Time: 20 minutes
- Cook Time: 20 minutes
- Category: Desserts, Snacks
- Method: Baking
- Cuisine: American
Nutrition
- Serving Size: 7
- Calories: 305
- Sugar: 22 g
- Sodium: 30 mg
- Fat: 18 g
- Saturated Fat: 6 g
- Unsaturated Fat: 12 g
- Trans Fat: 0 g
- Carbohydrates: 32 g
- Fiber: 2 g
- Protein: 7 g
- Cholesterol: 70 mg
Sophie Reynolds
Co-Founder, Recipe Curator & Culinary Educator
Expertise
Education
Auguste Escoffier School of Culinary Arts, Boulder, CO
Oregon State University
Sophie Reynolds is the recipe developer and culinary voice behind many of the approachable, flavor-focused creations at The Dream Café.
Sophie’s style leans into comfort food made simple: wholesome, satisfying meals anyone can make with confidence. Her passion lies in helping home cooks feel at ease in the kitchen while finding joy in the everyday act of cooking.