Decadent Oreo Brookie Ice Cream Cake Recipe

Magic Oreo Brookie Ice Cream Cake Recipe: A Sweet Treat

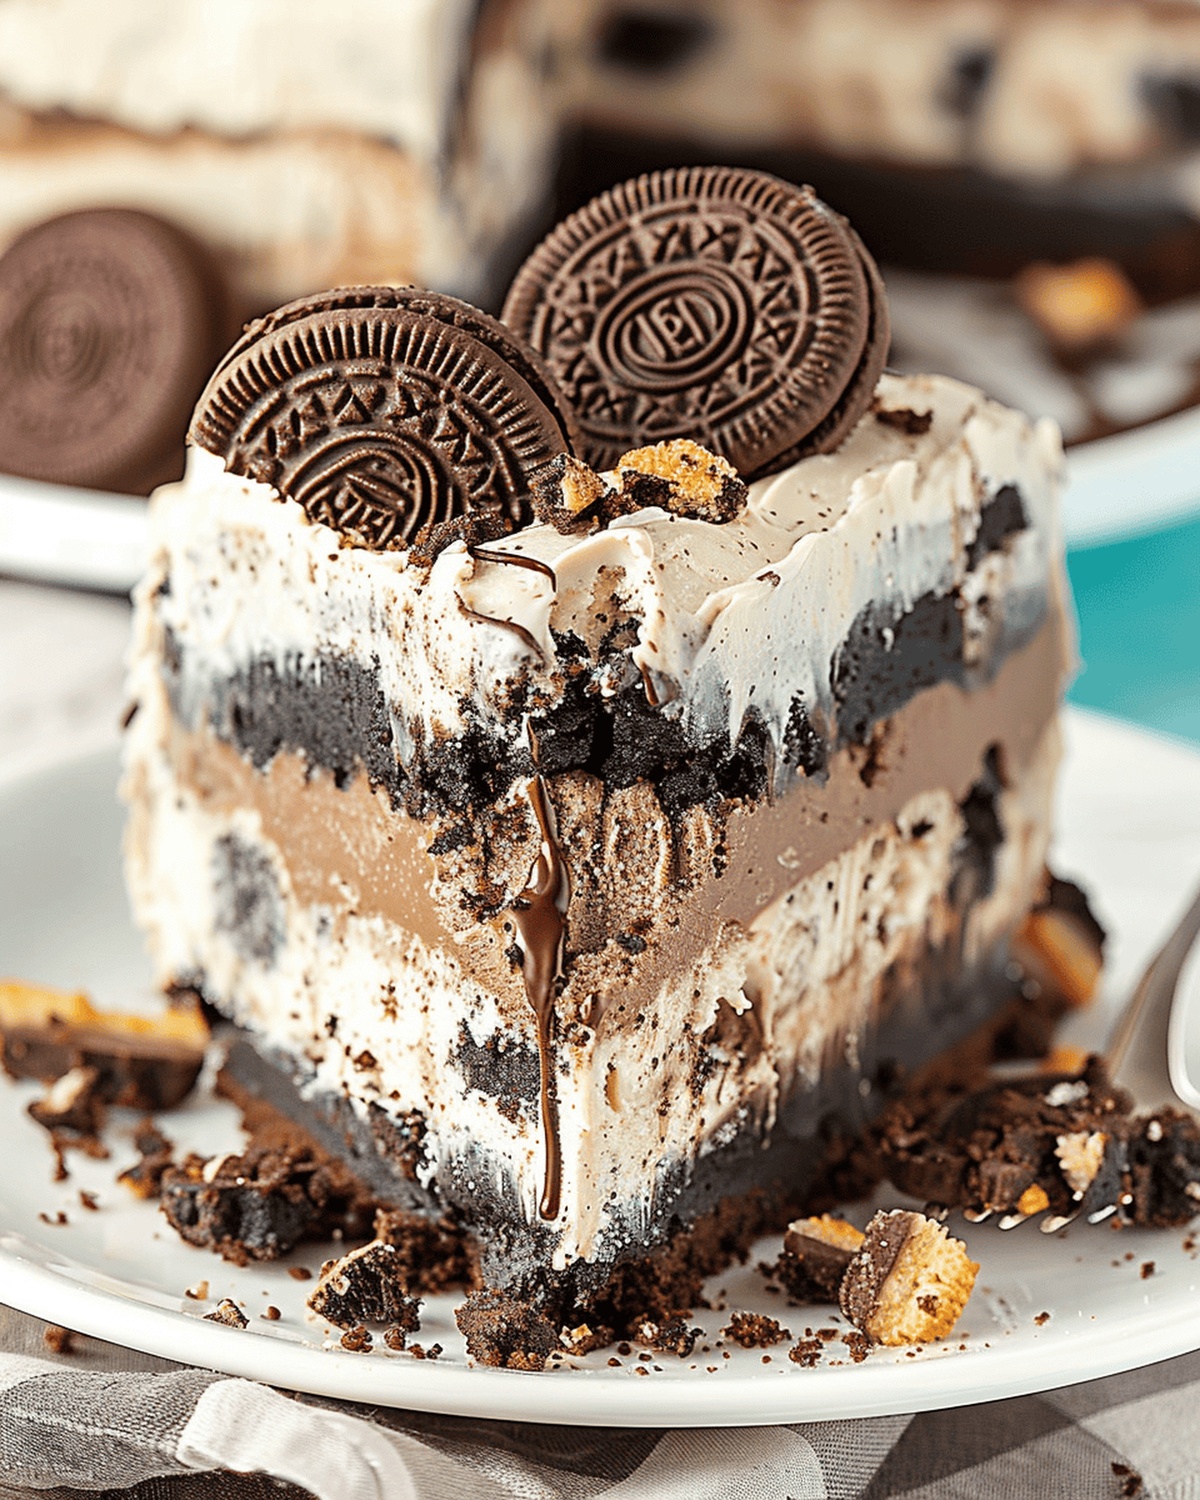
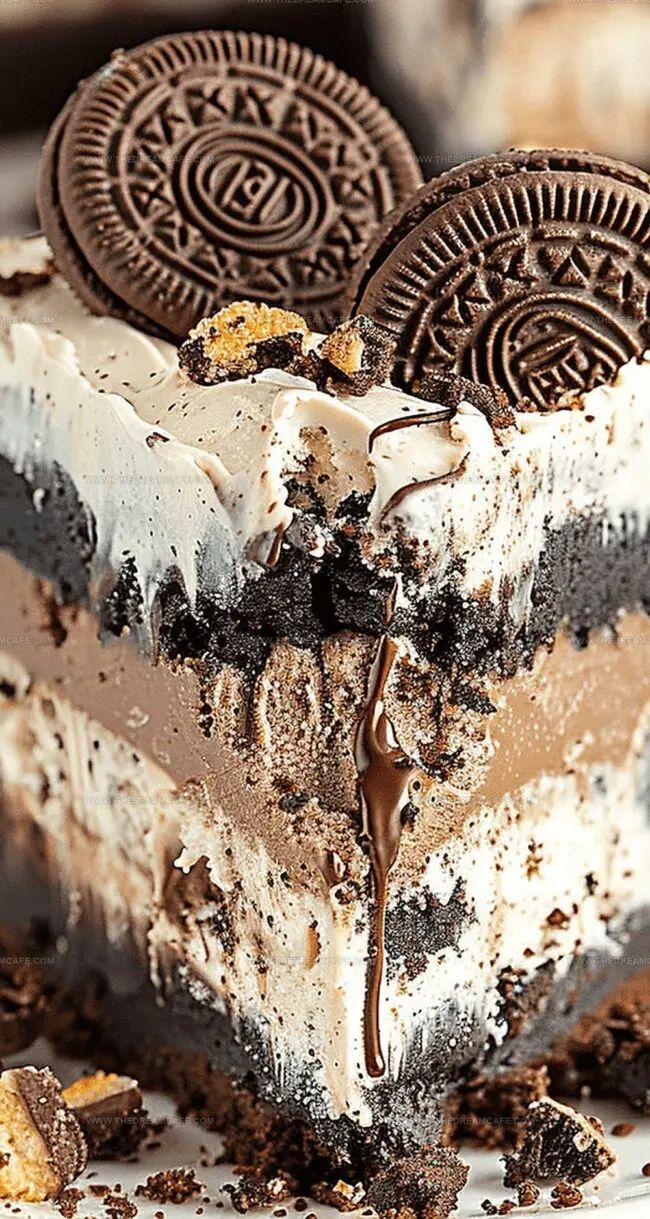
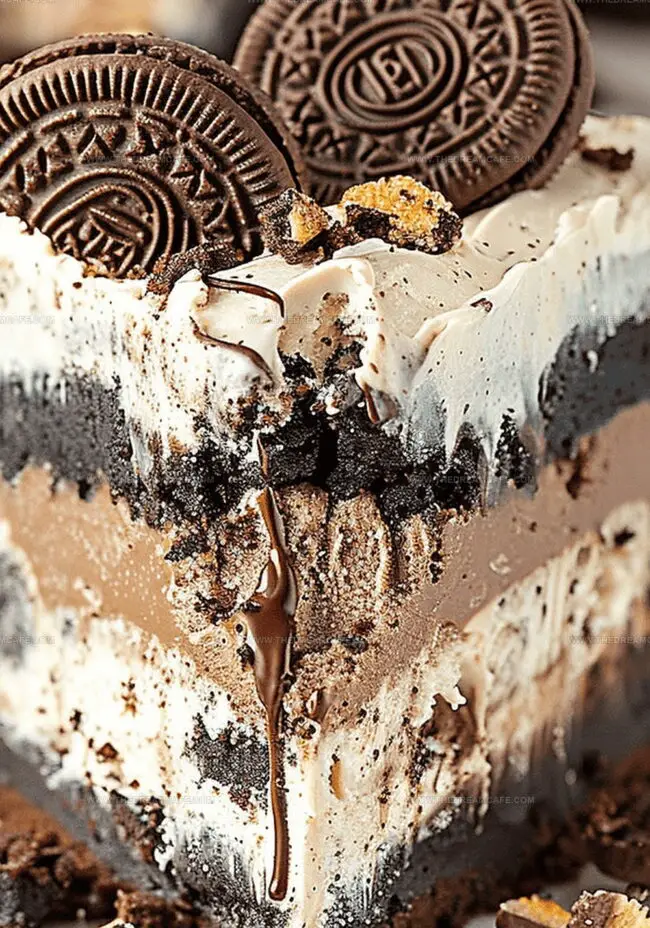
Decadent desserts reach new heights with this Oreo brookie ice cream cake that combines the ultimate chocolate lover’s dream.

Layers of rich, fudgy brookies mingle perfectly with creamy ice cream and crunchy Oreo cookies.

Chocolate chip cookie dough and brownie batter create a sinful base that melts in you mouth.

Each slice promises an explosion of indulgent textures and deep chocolate flavors.

Chilled and ready to impress, this dessert breaks all the rules of traditional cake making.

Cool, creamy, and completely irresistible, this showstopping treat will have everyone begging for seconds.

Let’s find out a slice of pure chocolate paradise that’s sure to become your new favorite summer dessert.

Quick Recipe Overview

Prep Time: 30 minutes

Cook Time: 25 minutes

Total Time: 55 minutes

Calories: 405 kcal

Servings: 13

What You’ll Need for Oreo Brookie Ice Cream Cake

For Cake Base and Filling:
  • Brownie Mix: Select a premium mix for rich, fudgy texture that creates a decadent foundation.
  • Cream Cheese: Ensures smooth, creamy consistency and adds tangy depth to the filling.
  • Brown Sugar, Sugar: Provide balanced sweetness and enhance caramel-like undertones.
  • Milk: Helps achieve perfect mixing consistency for cream cheese mixture.
  • Vanilla Extract: Adds warm, aromatic flavor that elevates the entire dessert.
For Crunch and Texture:
  • Chocolate Chip Cookie Crumbs: Introduces delightful crispy layer with buttery notes.
  • Chocolate Chip Cookies: Adds chunky, satisfying bite and visual interest.
  • Mini Chocolate Chips: Creates delicate chocolate bursts throughout the cake.
  • Oreo Crumbs: Delivers classic cookie flavor and dramatic dark color contrast.
  • Oreo Cookies: Provides iconic cookie crunch and recognizable taste profile.
For Finishing and Decoration:
  • Heavy Whipping Cream: Creates luxurious, light whipped layers and smooth ganache.
  • Powdered Sugar: Sweetens and stabilizes whipped cream topping.
  • Semi-Sweet Chocolate Chips: Generates rich, glossy chocolate ganache.
  • Cocoa Powder: Enhances deep chocolate flavor and creates elegant dusting effect.

Tools to Assemble Oreo Brookie Ice Cream Cake

  • Springform pan (8×3-inch): Essential for layering and releasing the cake easily.
  • Parchment paper: Helps line the pan and prevents sticking.
  • Large mixing bowls (2): Perfect for preparing cream cheese and whipped cream mixtures.
  • Electric mixer: Critical for whipping cream and blending ingredients smoothly.
  • Piping bag: Needed for creating decorative chocolate whipped cream topping.
  • Whisks: Ideal for mixing ganache and ensuring smooth consistency.
  • Measuring cups and spoons: Necessary for accurate ingredient measurements.
  • Spatula: Great for folding ingredients and smoothing layers.
  • Sharp knife: Useful for chopping cookies and cutting the final cake.
  • Spoon or squeeze bottle: Helps drizzle ganache around cake edges.

Instructions to Make Oreo Brookie Ice Cream Cake

  • Brownie Foundation A rich, fudgy base that sets the stage for deliciousness. Bake the brownie in a springform pan until perfectly cooked and let it cool completely.
  • Dreamy Cream Mixture Create a silky smooth cream cheese blend that will become the magical backbone of your dessert. Whip cream cheese with sugars until completely smooth, then fold in whipped cream gently.
  • Ice Cream Magic Craft two distinct ice cream layers bursting with flavor. One layer gets loaded with chocolate chip cookie pieces, while the other gets packed with Oreo cookie crumbles.
  • Decadent Chocolate Drizzle Prepare a luxurious chocolate ganache by melting chocolate with warm cream until perfectly glossy and smooth.
  • Layering Technique Carefully assemble your cake by placing the brownie base first, then adding alternating ice cream layers with ganache in between. Use parchment paper to help create clean, beautiful edges.
  • Whipped Cream Crown Top the cake with a cloud-like chocolate whipped cream, creating beautiful peaks and swirls.
  • Final Flourish Sprinkle an array of cookie chunks, chocolate chips, and brownie pieces across the top for a stunning presentation that promises pure indulgence.
  • Serving Perfection Allow the cake to soften slightly before serving, creating the ultimate creamy, rich dessert experience that will wow everyone at the table.

Fun Tweaks for Oreo Brookie Ice Cream Cake

  • Swap out store-bought brownie mix with your favorite homemade brownie recipe for a more personalized touch.
  • Replace chocolate chip cookies with peanut butter cookies or graham crackers to create a unique flavor profile that matches your taste preferences.
  • Fold in extra mix-ins like caramel bits, crushed candy bars, or toasted nuts into the ice cream layers for added crunch and surprising flavor bursts.
  • Use dairy-free cream cheese, whipped coconut cream, and lactose-free ice cream to make this decadent dessert accessible for those with dietary restrictions.
  • Prepare the entire cake up to a week in advance and store tightly wrapped in the freezer, making it perfect for stress-free party planning or unexpected dessert cravings.

How to Present Oreo Brookie Cake at Parties

  • Dessert Lovers' Paradise: This decadent Oreo Brookie Ice Cream Cake begs to be shared with friends and family during special celebrations.
  • Party Showstopper: Bring this stunning cake to birthday parties, summer gatherings, or potlucks to instantly become the culinary hero of the event.
  • Chocolate Lover's Dream: Serve chilled slices alongside cold glasses of milk or a rich espresso to complement the cake's deep chocolate flavors.
  • Make-Ahead Magic: Prepare this cake up to three days in advance, keeping it perfectly frozen until the moment you're ready to wow your guests with an incredible dessert experience.

Storing Oreo Brookie Ice Cream Cake the Right Way

  • Cold Storage Magic: Keep the Oreo Brookie Ice Cream Cake tightly wrapped in plastic film or placed in an airtight container to prevent freezer burn and absorb other food odors.
  • Smart Slice Strategy: Cut individual portions before freezing, then store separated slices in sealed freezer bags for quick and easy individual servings.
  • Temperature Control Tip: Store the cake at a consistent 0°F (-18°C) to maintain its creamy texture and prevent ice crystal formation during extended freezing periods.
  • Freshness Window: Consume within 4-6 days for optimal flavor and texture, as the cake's quality gradually declines with longer storage time due to potential texture changes and potential ice crystal development.
Print
clock clock iconcutlery cutlery iconflag flag iconfolder folder iconinstagram instagram iconpinterest pinterest iconfacebook facebook iconprint print iconsquares squares iconheart heart iconheart solid heart solid icon
Decadent Oreo Brookie Ice Cream Cake Recipe

Decadent Oreo Brookie Ice Cream Cake Recipe


5 Stars 4 Stars 3 Stars 2 Stars 1 Star

4.8 from 9 reviews

  • Total Time: 55 minutes
  • Yield: 13 1x

Description

Masterful chefs combine Oreo brookie ice cream cake as a delightful dessert merging chocolate chip cookies, brownies, and Oreos into a frozen treat. Layers of indulgence create a memorable experience you’ll savor with pure delight.


Ingredients

Scale
  • 1 (18.4 oz / 521 g) brownie mix
  • 12 oz (340 g) cream cheese, room temperature
  • 1 and ½ cups heavy whipping cream, cold
  • 9 oz (255 g) semi-sweet chocolate chips, divided
  • ½ cup heavy whipping cream, cold
  • ¾ cup heavy whipping cream, divided
  • 6 chocolate chip cookies, chopped
  • 6 Oreos, chopped
  • ¾ cup chocolate chip cookie crumbs
  • ¾ cup Oreo crumbs
  • ½ cup brown sugar
  • ¼ cup sugar
  • ¾ cup powdered sugar
  • ¼ cup mini chocolate chips
  • 3 tbsps milk
  • 1 tbsp vanilla extract
  • 2 tbsps powdered sugar
  • 2 tbsps natural unsweetened cocoa powder

Instructions

  1. Pan Preparation: Grease an 8-inch springform pan and line the bottom with parchment paper. Bake brownie layer according to package instructions, then cool completely.
  2. Cream Cheese Foundation: Blend softened cream cheese with granulated and brown sugars until smooth. Gradually incorporate whole milk and vanilla extract, mixing until harmonious.
  3. Whipped Cream Integration: Whip cold heavy cream with powdered sugar until forming glossy, stiff peaks. Delicately fold into cream cheese mixture, maintaining its airy structure.
  4. Ice Cream Flavor Development: Divide ice cream base into two portions. Infuse one half with chocolate chip cookie crumbs and miniature chocolate chips; blend the second portion with crushed Oreo cookies.
  5. Ganache Preparation: Heat heavy cream until near boiling, then pour over chocolate chips. Allow to rest briefly before whisking into a luxurious, glossy sauce.
  6. Layering Technique: Reinstall parchment paper in springform pan, extending above rim. Position cooled brownie base, then carefully spread chocolate chip cookie ice cream layer. Drizzle first ganache batch across surface.
  7. Freezing and Structural Assembly: Add Oreo-infused ice cream layer, ensuring even distribution. Freeze cake for 6-8 hours or overnight until completely solidified.
  8. Decorative Embellishments: Crumble additional brownies, Oreo cookies, and chocolate chip cookies. Create second ganache batch using identical method.
  9. Finishing Touches: Whip additional heavy cream with powdered sugar and cocoa powder. Remove cake from pan, drizzle ganache around perimeter, and pipe chocolate whipped cream dome.
  10. Final Presentation: Garnish with cookie fragments, chocolate chips, and various cookie pieces. Allow cake to soften slightly at room temperature before serving. Store in freezer and consume within 4-6 days for peak deliciousness.

Notes

  • Chill Pan Properly: Ensure springform pan is completely clean and dry before reassembling to prevent moisture interference with cake layers.
  • Whip Cream Technique: Maintain cold temperatures and use electric mixer at high speed to achieve stiff, glossy peaks without deflating the cream’s volume.
  • Layering Precision: Spread ice cream layers evenly and gently to prevent air pockets and ensure smooth, uniform texture throughout the cake.
  • Freezing Strategy: Allow sufficient freezing time (6-8 hours or overnight) to create solid, well-integrated layers that hold their shape when sliced.
  • Prep Time: 30 minutes
  • Cook Time: 25 minutes
  • Category: Desserts, Snacks
  • Method: Baking
  • Cuisine: American

Nutrition

  • Serving Size: 13
  • Calories: 405
  • Sugar: 34 g
  • Sodium: 180 mg
  • Fat: 28 g
  • Saturated Fat: 17 g
  • Unsaturated Fat: 9 g
  • Trans Fat: 0 g
  • Carbohydrates: 38 g
  • Fiber: 2 g
  • Protein: 5 g
  • Cholesterol: 75 mg
Sophie Reynolds

Sophie Reynolds

Co-Founder, Recipe Curator & Culinary Educator

Expertise

  • Home Cooking Innovation & Comfort Recipes
  • Flavor Development & Ingredient Pairing
  • Seasonal Produce Integration
  • Recipe Testing & Instructional Clarity
  • Culinary Education & Community Workshops

Education

Auguste Escoffier School of Culinary Arts, Boulder, CO

  • Degree: Diploma in Culinary Arts
  • Focus: Hands-on training in classic and modern culinary techniques, emphasizing sustainable cooking practices, kitchen professionalism, and real-world restaurant experience through externships.

Oregon State University

  • Degree: B.S. in Nutrition and Food Management
  • Focus: In-depth study of human nutrition, food safety, meal planning, and food-service operations, with a strong foundation in public health, dietetics, and community-based nutrition programs.

Sophie Reynolds is the recipe developer and culinary voice behind many of the approachable, flavor-focused creations at The Dream Café. 

Sophie’s style leans into comfort food made simple: wholesome, satisfying meals anyone can make with confidence. Her passion lies in helping home cooks feel at ease in the kitchen while finding joy in the everyday act of cooking.

Leave a Reply

Your email address will not be published. Required fields are marked *

Recipe rating 5 Stars 4 Stars 3 Stars 2 Stars 1 Star