The Ultimate Melting Mint Brownies Recipe: Fudgy Chocolate Bliss
Mint lovers, these melting mint brownies deliver an unexpected chocolate-mint symphony that dances across your taste buds.
Fudgy chocolate forms the rich foundation for a refreshing emerald-tinted frosting that reimagines an ordinary dessert into a spectacular treat.
Each bite promises a complex interplay of intense cocoa and cool mint notes that tantalize the palate.
Creamy layers combine to create a decadent experience that feels simultaneously indulgent and light.
Soft, gooey textures meld with sharp peppermint undertones, making this dessert a sensory adventure.
Home bakers can easily craft these impressive sweets without complicated techniques or rare ingredients.
Prepare to wow friends and family with a dessert that looks and tastes like a professional bakery creation.
Why Melting Mint Brownies Will Steal the Show
What You’ll Need for Melting Mint Brownies
Chocolate Base Ingredients:Flour Ingredients:Egg and Topping Ingredients:How to Bake Melting Mint Brownies with Ease
Step 1: Prepare the Oven and Baking Pan
Preheat the oven to 350°F. Line a 9×13-inch baking pan with parchment paper, ensuring complete coverage for easy removal.
Step 2: Create the Brownie Base
In a medium bowl, combine:Mix thoroughly. Add cocoa powder and beat on low speed until the mixture becomes smooth and well-incorporated.
Step 3: Blend in Eggs and Dry Ingredients
Beat eggs into the mixture on low speed until creamy. Gently fold in flour and baking powder, mixing until just combined. Avoid overmixing to maintain a tender texture.
Step 4: Bake the Brownie Layer
Spread the batter evenly in the prepared pan. Bake for 20 minutes until a toothpick inserted comes out with a few moist crumbs. Allow brownies to cool completely at room temperature.
Step 5: Whip Up the Mint Frosting
In a mixing bowl, beat butter and sour cream until light and fluffy. Gradually add powdered sugar, beating on medium speed for 5 minutes. If the frosting seems too thick, add milk a teaspoon at a time.
Step 6: Flavor and Color the Frosting
Mix in peppermint extract and a few drops of green food coloring until the frosting reaches your desired mint shade and flavor intensity.
Step 7: Frost and Chill
Spread the mint frosting evenly over the cooled brownie layer. Refrigerate for 20 minutes to set the frosting and make cutting easier.
Step 8: Garnish and Serve
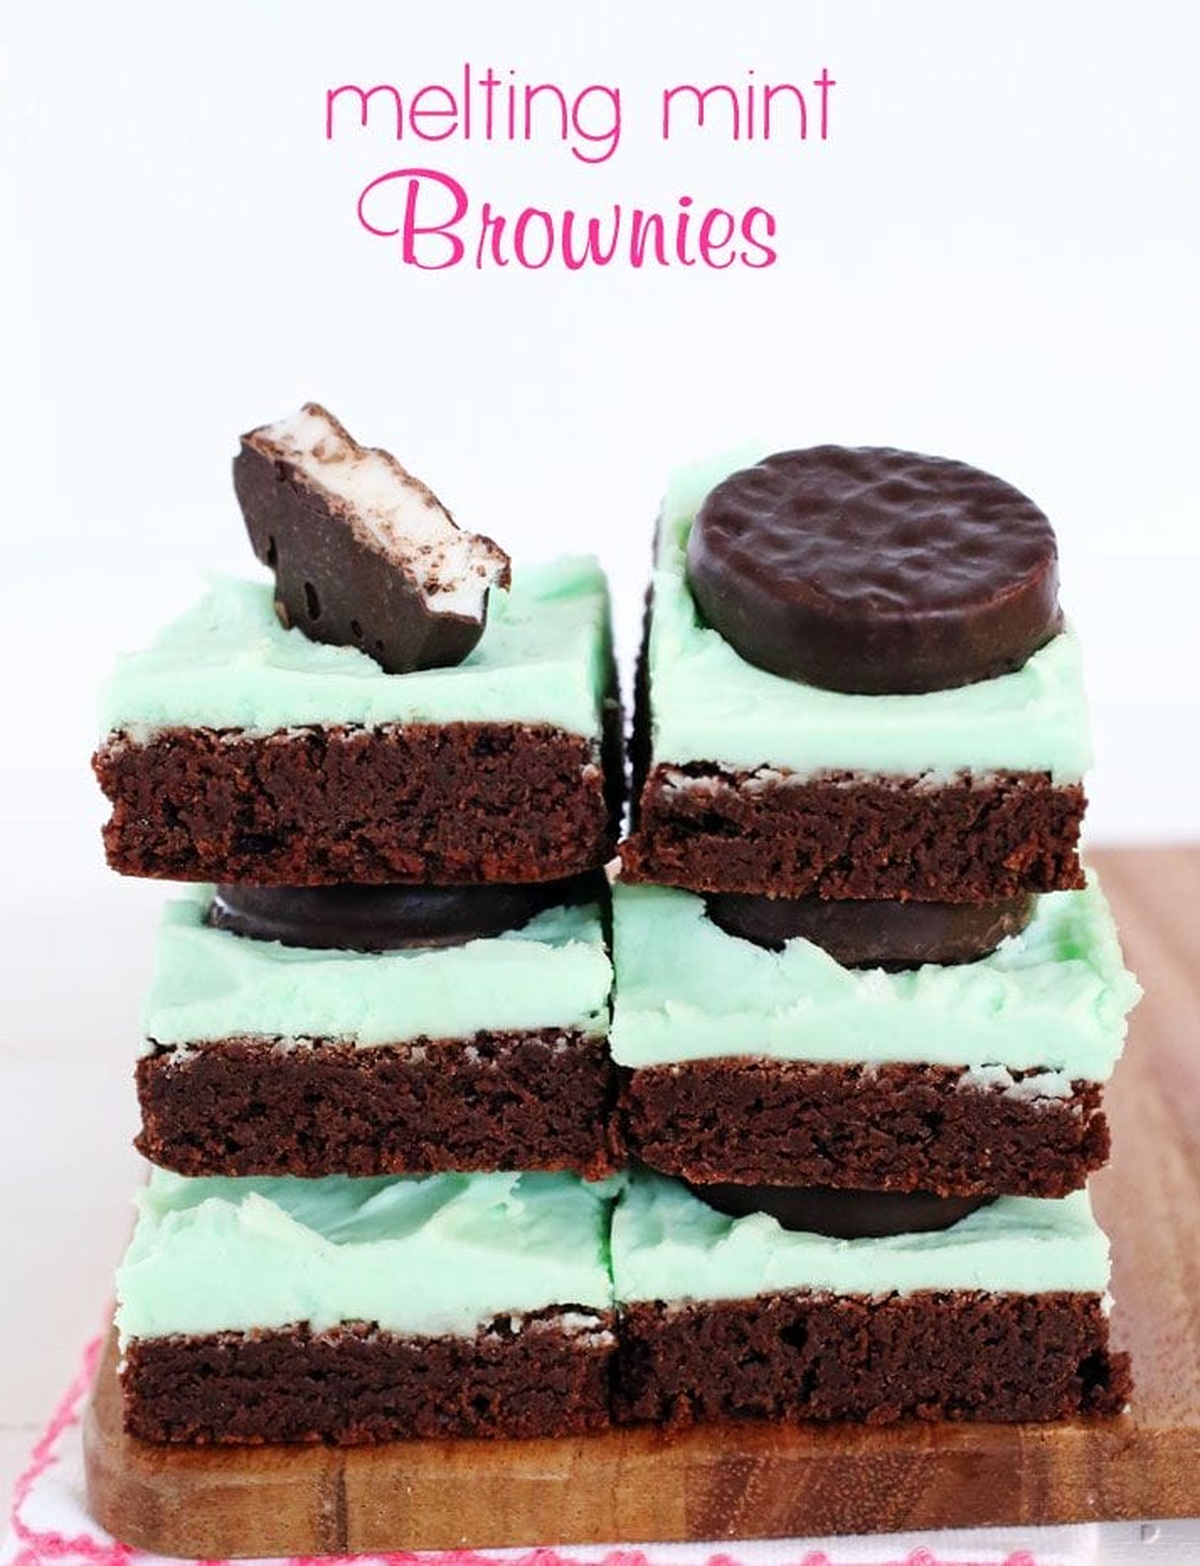
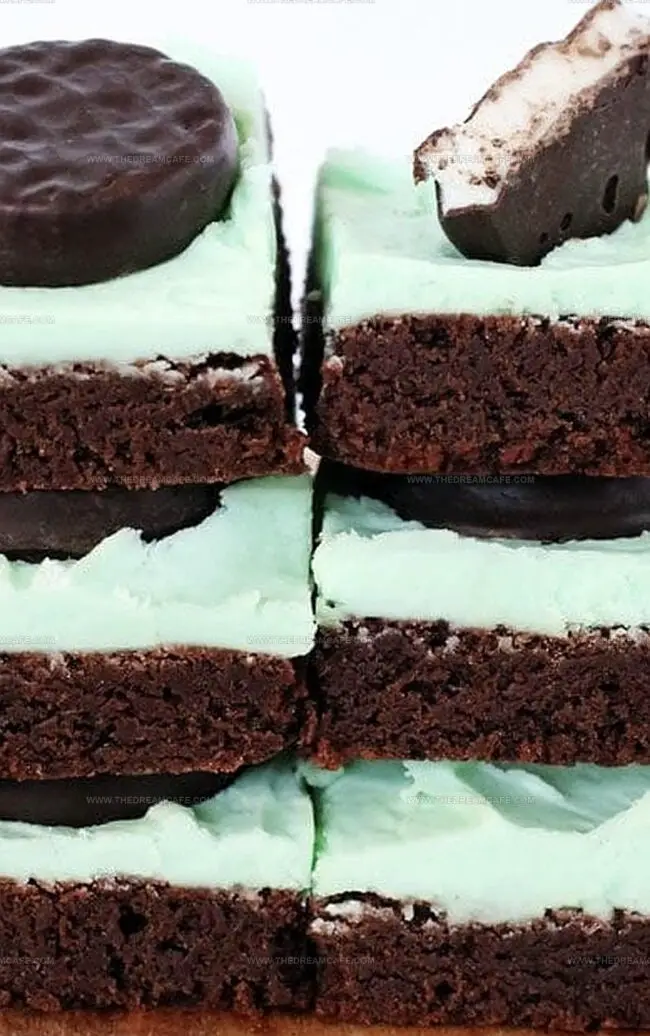
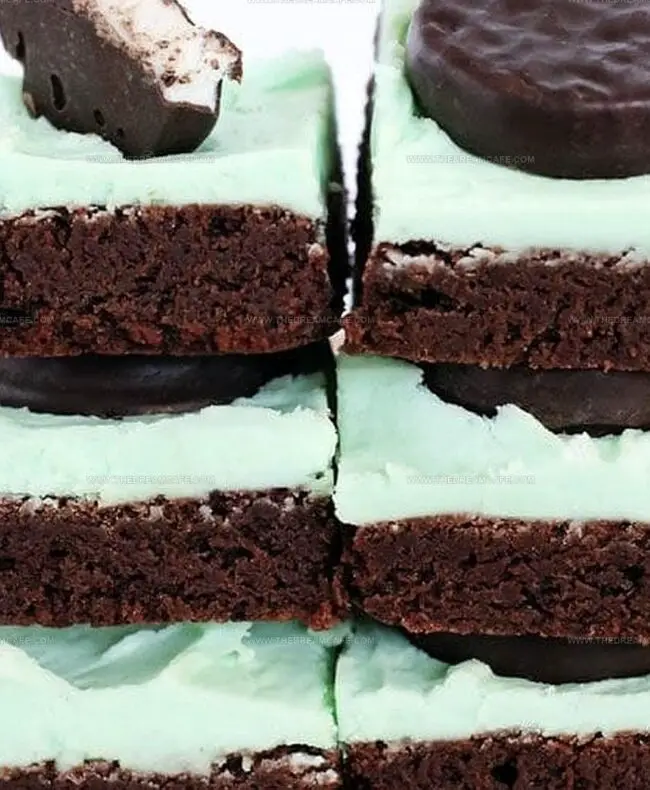
Cut the brownies into 20 squares. Top each square with a peppermint patty for an extra burst of minty goodness.
Step 9: Store and Enjoy
Keep the brownies tightly covered in a cool, dry place. They’ll stay fresh for 3-4 days, perfect for satisfying sweet cravings throughout the week.
Tips to Get That Perfect Minty Fudge Texture
How to Store and Reheat Melting Mint Brownies
What Goes Great with Melting Mint Brownies
Tasty Variations on Classic Melting Mint Brownies
Print
Melting Mint Brownies Recipe
- Total Time: 40 minutes
- Yield: 20 1x
Description
Melting Mint Brownies offer a luxurious chocolate journey with cool mint undertones. Rich chocolate layers combine with refreshing peppermint, creating an irresistible dessert that will leave you craving another delightful bite.
Ingredients
Main Ingredients:
- 3 large eggs
- 1 + ½ cups sugar
- ¾ cup butter (melted)
- ¾ cup unsweetened cocoa powder
- ¾ cup unbleached all-purpose flour
Binding and Leavening Agents:
- ½ teaspoon salt
- ½ teaspoon baking powder
Mint Frosting Ingredients:
- 3 cups confectioners’ sugar
- 5 tablespoons softened butter
- ¼ cup sour cream
- 1 tablespoon milk (if needed)
- ¼ teaspoon peppermint extract
- 4 or 5 drops green food coloring
Optional Topping:
- 1 bag small peppermint patties
Instructions
- Prepare the baking equipment by preheating the oven to 350°F (177°C) and lining a 9×13-inch (23×33 centimeters) baking pan with parchment paper, ensuring full coverage of the bottom and sides.
- In a medium mixing bowl, combine melted unsalted butter, granulated sugar, and salt. Incorporate cocoa powder and mix using a low-speed electric mixer until the mixture becomes smooth and homogeneous.
- Introduce eggs to the chocolate mixture, beating on low speed until the texture becomes creamy and well-integrated.
- Gently fold in all-purpose flour and baking powder, mixing until ingredients are just combined. Avoid overmixing to maintain a tender brownie texture.
- Transfer the brownie batter into the prepared pan, spreading it evenly with a spatula to create a uniform layer approximately 1/2 inch (1.3 centimeters) thick.
- Bake in the preheated oven for 20-22 minutes. Remove and allow the brownies to cool completely at room temperature, which typically takes about 1 hour.
- Prepare the mint frosting by whipping unsalted butter and sour cream together until light and fluffy, approximately 3-4 minutes.
- Gradually incorporate powdered sugar into the butter mixture, beating on medium speed for 5-6 minutes. If the frosting seems too thick, add milk (at a time) to achieve a spreadable consistency.
- Enhance the frosting with peppermint extract and a few drops of green food coloring, mixing until the color is evenly distributed.
- Once the brownies have cooled, spread the mint frosting in a smooth, even layer across the entire surface.
- Refrigerate the frosted brownies for 20-25 minutes to allow the frosting to set and become firm.
- Remove from refrigerator and slice into 20 equal squares using a sharp knife wiped clean between cuts.
- Garnish each brownie square with a peppermint patty placed in the center for an additional burst of mint flavor.
- Store the brownies in an airtight container in a cool, dry location for 3-4 days to maintain freshness and prevent moisture accumulation.
Notes
- Cooling time matters more than you might think, ensuring your brownies set perfectly without becoming soggy.
- Refrigerating the frosted brownies helps the mint layer firm up and creates a delightful texture contrast.
- Peppermint patties add a professional bakery-style finishing touch that elevates these homemade treats.
- Room temperature ingredients blend smoother, especially eggs and butter, creating a more consistent brownie base.
- Sour cream in the frosting brings a tangy richness that balances the sweet mint flavor brilliantly.
- Prep Time: 20 minutes
- Cook Time: 20 minutes
- Category: Desserts
- Method: Baking, Blending
- Cuisine: American
Nutrition
- Serving Size: 20
- Calories: 280 kcal
- Sugar: 32g
- Sodium: 200mg
- Fat: 12g
- Saturated Fat: 7g
- Unsaturated Fat: 4g
- Trans Fat: 0g
- Carbohydrates: 40g
- Fiber: 2g
- Protein: 3g
- Cholesterol: 50mg
Julian Park
Co-Founder, Cuisine Researcher & Food Culture Writer
Expertise
Education
The Institute of Culinary Education (ICE), Los Angeles, CA
Julian Park is a natural storyteller at The Dream Café who blends hands-on culinary experience with a passion for exploring global food traditions. A graduate of The Institute of Culinary Education in Los Angeles, Julian combines professional technique with a love for cultural discovery, diving into how dishes reflect heritage, migration, and identity.
His work spans everything from in-depth cuisine guides to reflections on everyday meals around the world. With a curious palate and a journal always close by, Julian helps readers connect with food in a way that feels so insightful and personal.